
Subscribe
Be the first one to know saramonic latest products, newest sponsorships, and event invites. Subscribe today.
The best way to pick up sounds on a film set? Many people would probably choose shotgun mics as their go-to solution. But sometimes it's impossible to do so in wide scenes. In that case, lavalier mics are the only option. In this blog, you'll learn 3 common mistakes and take away fixes.
It's recommended that the lavalier microphone is fixed in a place, usually the chest or the collar, 10 to 15 centimeters away from the mouth. If the lav mic is placed too close to the talent's mouth, you may get muffled sounds. If too far down, the sounds can become thin and distant.
You may also need to consider the talent's volume. If he or she is loud by nature, move the microphone farther down the garment. And move it up a bit if he or she is soft-spoken. Try until you find the sweet spot.
The rustling sounds can be a major problem when talent's clothing rubs against the microphone, and it immediately makes the audience aware of the gear. To avoid that, you may use specially-made mic mounts or something as everyday as moleskin tapes if you do not have access to those fancy options. Here's how you can create a lavalier microphone sandwich. (Moleskin works great at reducing rustling noise.)
Step 1: Cut 2 sections of moleskin tape with one bigger and longer than the other.
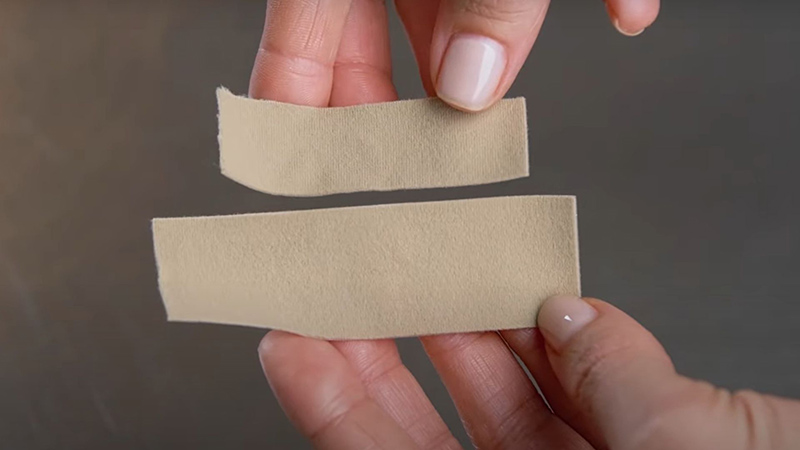
Step 2: Place the lav mic to the smaller one, edge-to-edge. Adhere the microphone to the bigger one.
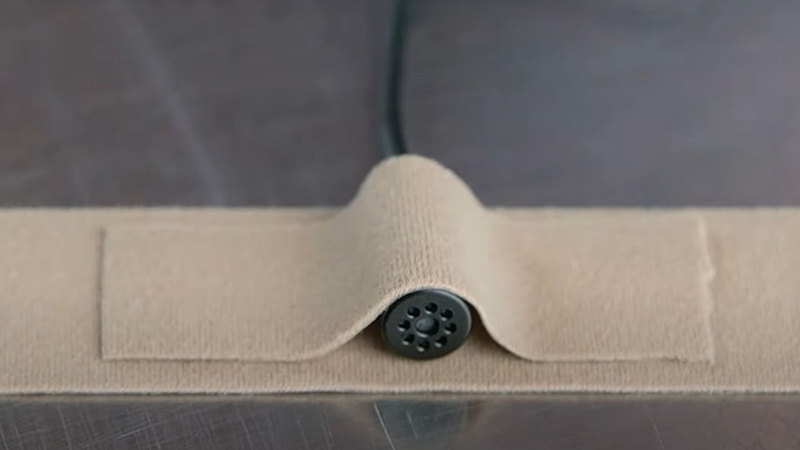
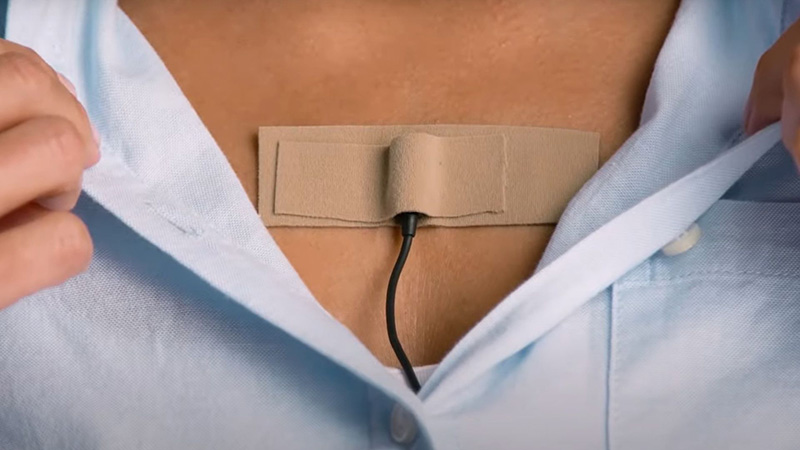
Step 3: Adhere the lav mic and the smaller moleskin to the larger one and stick the entire set to the talent's skin.
You may watch the entire tutorial on YouTube: https://www.youtube.com/watch?v=Pbxy0OupNbA&t=108s
Another pro tip: You may stick the microphone on the opposite side of the talent's dominant hand — on the left part of a shirt if the talent is right-handed and vice versa. Tell the talent to not touch the microphone when micing up. This would contribute majorly to premium sound capture.
Last but not least, in case the talent needs to move in the scene, ask him or her to move as instructed before official rolling. So you know what to expect.
Many lavalier microphones on the market have a waterproof-rating, such as the IP67-rated K9 lav mic. However, being waterproof is one thing, but getting muffled recordings is another. In scenes where sweat or water is a part of the storytelling, you may want to protect the microphone from humidity — namely beads of sweat or water get their way into the capsule, covering the microphone with a thin layer of moisture and making the recording muffled. What makes it even worse is that it takes time to rid the capsule of the water, delaying the whole workflow. Christian Lebert, audio supervisor from the Discovery Channel, uses everyday items you can find to protect a lav mic — surgical-grade glove, double-sided tape, and rubber bands to conceal a lav mic. Inexpensive and practical.
Clean audio is an important part of content creation and filmmaking. And lavalier microphones are one of the sound solutions for big wide scenes. Make sure to test the distance by testing different placement, avoid the rustling noise by using professional gear or something as simple as medical tape, and protect the microphone from moisture with medical glove.